How To Install Datafeedr Onto A WordPress Website
Today I would like to show you how to install Datafeedr onto a WordPress website. Datafeedr is a great way of populating your website within your niche. It’s also a great way of keeping your products up-to-date with pricing and products that are no longer available.
I find the best way of utilising Datafeedr is to populate my website with products and then blog to various products on my website. This is far easier than having to keep checking that products are up-to-date and that there are no broken links etc. if you would like to know more about Datafeedr, please follow this link.
You Can Find Out More About Datafeedr Here
Installing Datafeedr
So I have just installed a new WordPress website, so the first thing that I normally do on a new website is to install Datafeedr.
Before we start installing Datafeedr, first go down to settings and general and check that your website is set for the appropriate time in your country. It is also good to check that your language settings are correct and the date and format are correct. Once you have checked these settings make sure and click on save.
Add The Necessary Plug-Ins
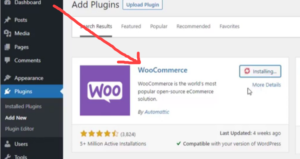
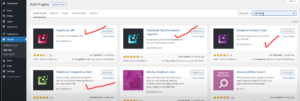
I’m now going to the plug-ins page and then, “add new”, in the search bar, type, “WooCommerce”. Install the plug-in that says, “WooCommerce”. In the meantime, I have opened another tab within the plug-ins page, type in, “Datafeedr”. Here you can see four plug-ins that need to be installed on our website. The first ones being, Datafeedr API, Datafeedr WooCommerce Importer, Datafeedr Product Sets and finally Datafeedr Comparison Sets. Once the plug-ins have been installed on your website, you can then activate the plug-ins.
Connecting To WooCommerce
WooCommerce seems to change the way they connect plug-ins quite regularly. The easiest way is to follow my video above or to just follow the on-screen instructions.
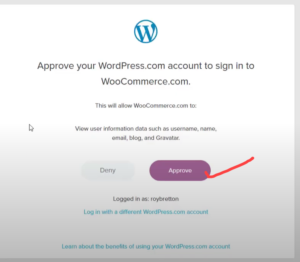
We need to connect our website with WooCommerce and then click on the “Approve” button. Often WooCommerce will ask you to authorise the connection, just click on the “approve” button.
Now Back To The Plug-Ins
We are going to activate all the plug-ins as we will be needing all the plug-ins soon.
Now We Are Going Back To WooCommerce
There are a few settings that we need to check before we do any more. So, we need to go back to WooCommerce and then click on “settings”. Most of the settings are self-explanatory, just check that your country is set for your particular country. In my case, it’s the United Kingdom. Something else that I had to change was the currency, I have set my currency to pounds as I’m in the United Kingdom. Once you have checked all your settings, don’t forget to click on save settings.
Let’s Go To Products
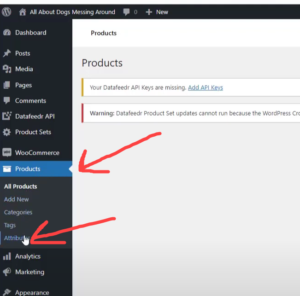
Under the WooCommerce section, we can see “products”, we then need to go to “attributes”. Let’s go and add some new attributes, the first one will be “Network” and then in the default sort order, we will change to “Name”. Then click on “Add Attribute”.
We need to carry out this process three times, the second attribute will be “Merchant” and the third attribute will be “Brand”. We then change the default sort order to “Name” and then click on add attribute which will save our work.
Datafeedr API Settings
It’s now time to add our API keys. If we go to Datafeedr API and then “configuration” we can now put in our two API keys. We can find our Datafeedr API keys within our Datafeedr account. We need to make sure and save our changes, as always.
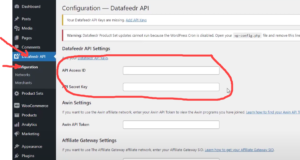
Select Networks
We now need to select our networks, you see that in the screenshot I have marked with a couple of arrows two ways to arrive at “Networks”. You see that there are many networks available, in this example, I am just going to set two networks. One is “Paid on Results” and the other one is “Webgains”.
I’m going to check the box on “Paid on Results” and then add my affiliate ID which is required. In case you’re wondering what your affiliate ID is, this is something that we are given when we signup for an affiliate network. It’s important to put your affiliate ID incorrectly. If you can’t find your affiliate ID then contact your affiliate network. Once again, we need to save our changes.
Hosting Setup
It’s important that your hosting is set up correctly as Datafeedr needs to have the WordPress Cron enabled. You can see that in the diagram below the Cron is currently disabled. If you have access to your hosting, you will need to enable the Cron. Or in my case, I will contact my hosting provider. If you need hosting, you can find quality hosting here.

To Conclude
I have found Datafeedr to be a great time saver and a way of creating and adding products on websites very efficient. It’s very quick to populate a WordPress website with the necessary products associated with any niche. The products can easily be categorised and moved around your website and the great thing is a website is kept up-to-date with the latest products.
Working Online
I have been earning money online since 2007, the power of the Internet never fails to amaze me. If you would like to know more about how I started and more about my recommended products please go here. I am here to help. You can find more about me here.