I first started using Datafeedr back in 2011, I cannot actually remember the reason I stopped using it, but anyway I’m about to start using Datafeedr again!
I’m Not Particularly Technical
First of all, I’m not particularly technical although I do enjoy technical stuff, the problem is having enough time to learn how to use software, plug-ins etc as my main aim is to write content for my websites and I really don’t have huge amounts of time to learn too many extra skills.
BlogPig
Over the years I have tried various data feed products with the help of my excellent Webmaster. I believe the first piece of software that we tried was called Blogpig, I can’t remember actually how it worked but it added products to your website which was extremely useful for a new website. It’s always a problem when you have a brand-new website and sometimes you want to add products quickly so you can then blog about these particular products. Blogpig actually seemed to work okay, it simply just put the content on your website from a CSV file once and that was it, if I remember rightly it didn’t actually do any updates, so the principal was quite straightforward, I think I used broken link checker to check my links were all up to date on a regular basis.
Blogpig is definitely a quick way of populating your website, however, it doesn’t really offer any functionality, but it did the job at the time and I believe the following day we actually had sales, so something worked! Unfortunately, it appears that Blogpig is no longer available, whether there is something else that has replaced it I do not know, I’ll be interested to hear if there is anything similar on the market.
WP Import
The next importer that we tried is something called WP Import, this comes with a 30-day money back guarantee and has about 7000 customers. I’ve used WP import for several years now, however, I don’t find it particularly straightforward to use and I believe that Datafeedr will make the job much easier and much less technical to someone who wants to avoid too much techie stuff. WP import uses a CSV or XML file to import products into WordPress theme, it apparently works with any plug-in for any WordPress theme and you can drag and drop files into your website. It does amaze me how you can make an Excel file into a nice product on a WordPress website very quickly.
It is capable of loading very large files onto your website, I have several files that have 5000+ products on and although this is a huge amount of products it still works on shared hosting, however, it does take a few hours to update and also slows up your website considerably when there is a download going on. This is one of the reasons that I am trying out DataFeedr again as I feel it puts much less strain on your hosting and interface and for someone like me it’s much more user-friendly. However, I don’t want to run a product down because I believe this is partly due to my lack of knowledge on technical stuff and I’m not really willing to put time into learning this type of thing. I believe that the functionality is almost as good as Datafeedr, however, I believe using datafeedr the updates and automation will be so much easier and once it is set up there’s a lot less work to do.
Datafeedr
I have literally just purchased Datafeedr for the second time after several years break a couple of days ago, so at the moment I’m just testing on a dummy website. So far so good, the functionality has improved a lot since I first tried this product back in 2011. It took me about two hours to set up Datafeedr and once I’d found the setup video which is shown in the documentation, I actually had to email support for the link to the step-by-step video. I don’t understand why companies who produce software don’t produce more step-by-step video guides, it would save them huge amounts of effort into replying to emails about functionality and how to too’s! I have to say that I have already emailed support several times so far and their response time has been very good and very helpful.
I find the datafeedr interface fairly straightforward to use and the good thing is that you don’t actually need any technical knowledge, it’s is just a case of learning how the product works, which will come with practice, it is extremely useful having a test site to test Datafeedr on!
Datafeedr now works in conjunction with the Woo Commerce storefront which offers even more functionality, I like the ability to be able to make it easy for the user to find particular products. For example, there is a comparison feature, so for affiliate marketing, you can have several different prices from different stores for the same product, and extremely beneficial feature!
It also offers the ability to sort by manufacturer, product type and last viewed and suggested, all things I believe lead to a very pleasant user experience.
In this video, I would like to show you how to check your website speed. It’s something that lots of website owners don’t bother doing, however, it could be costing you traffic. I think we have all been on websites where they are so slow to load, that we just go on to another website. The problem could be just a small glitch in the system at that time or the website may have shared hosting that can lead to slower load times. The can be many reasons for a slow website.
If you carry out a Google search for page speed insights or you can go directly to the page here, this will take you to the correct page. Once you’re on the page, all you need to do is type your website address into the webpage URL and then click on analyse.
It’s important to have the right type of hosting for your website. I personally have a dedicated server, but I also use the Wealthy Affiliate hosting, which you can find here. The Wealthy Affiliate hosting is absolutely fine for people who want to get started online. The only reason that I moved to a dedicated server was that my website receives quite a lot of traffic and I also use a Datafeedr, which is fairly server-heavy. I also have more options for hosting here.
You Can See My Video below About How To Check Your Website Speed
You Can Check Out My YouTube Transcript Below
Hi there, it’s Roy Bretton here. I hope you’re doing well. In this video, I want to show you how to check your website speed. Sometimes, we go onto a website and it seems to load instantly, and other times, it seems like we’re waiting ages. Many people will just go to another website if a website is slow to load, so it’s important that your website loads quickly. Here, I have put in the title “page speed,” and this will bring up a Google Page Speed Insights page. Let’s go to it. This is a fairly newish website, which I haven’t done much work on, so let me just find a post here. Let’s copy that post, go to Page Insight, and then click analyze. It’ll take a few moments to analyze.
Analyse Your Website
Analyse Your Website
I haven’t done anything with this website, and another thing is that it has a YouTube video embedded within the thumbnail. YouTube uses its own server, but it can still slow your website down. Let’s go back to Page Insights. This is for mobile, so performance is 57, accessibility 98, best practices 96, SEO 93, so it looks like there’s some work to do there. It gives us all sorts of figures. Now, this is for mobile. Let’s just scroll down a bit. These are all the diagnostics.
I’m not going to go through what to do on these in this video because it’ll be too long, but this is just to check out your page speed initially. Then we can go to the desktop. The Desktop’s results are a bit better, performance 78, but it’s still not green, so we need to improve that. It’s got the score here, not 49 warning red, orange 50 to 89, so it’s not until you hit the green we have to be 90 plus. Obviously, Google finds it quite important.
Diagnose Performance Issues
Diagnose Performance Issues
Now let’s just, out of interest, try another website. Once again, this is a website with very little content; no real work has been carried out on it. Let’s click on here, paste that in, and see what happens. Okay, let’s try that again, unable to resolve validity. This website here, for some reason, is not going to analyze it. Let’s try another post here, on the homepage. Now that’s loading. I did actually try this website earlier, and it worked fine in testing the page speed in Insight, so I’m not quite sure what’s wrong, but probably if I came back another time, it would probably work as I said it worked earlier.
Here, the performance is 58, accessibility 100, best practices 96, and SEO 100. Now, this is quite a long blog post, so I think it’s got, I can’t remember how many words, I think it’s around 6,000 words plus, so it’s long, plus it’s has a YouTube video. But once again, there are some things to work on there. This gives us some good page speed insights. Desktop it goes up to 74, so there are some things we can do.
Anyway, that gives you an idea of how to find your page insight, I’ll try to make another video later on how to sort these particular issues out and take it from there. So, if you have any questions on this, please feel free to leave a comment in the comment section and like this video. Thank you very much for watching.
Today, I would like to talk about the top affiliate marketing programs to join. There are many programs out there, but today, I will look at the programs that I have used over the years. If you’re not sure what affiliate marketing is, you can read an earlier article that I wrote entitled “What is affiliate marketing?”.
Affiliate marketing has changed the way many companies promote their products. It’s also opened up opportunities for people like myself to promote other people’s products online. It’s great for the companies producing the products, as it means they have other people marketing their products. Affiliate marketing is also great for people like myself who promote various different affiliate products online. So you could say that it’s a win-win situation.
At its core, affiliate marketing involves an affiliate, like myself, promoting products or services and being compensated for every sale or action completed through a unique tracking link. Once the great faxes that I don’t need to handle the products at all, this is a great bonus.
You Can See My Video Interpretation Of This Blog Post Below
This performance-based system benefits both the merchant and the affiliate. Merchants gain increased exposure and sales, while affiliates earn a commission without the overheads of creating a product.
Different programs offer distinct commission models, marketing tools, and product ranges, catering to various markets and affiliate strengths.
In the next section, I will share some insights into the factors that can influence your choice of an affiliate program.
Factors To Consider When Choosing An Affiliate Program
Deciding on an affiliate program requires careful consideration. Your choice will significantly impact the potential for earnings and the success of your marketing efforts. Here’s what I prioritize when evaluating options.
The very first step I take is to carry out a Google search on the type of affiliate product I am looking for. More often than not, this will bring up several different programs that align with what I am looking for. I often find that I am already a member of one of the affiliate programs promoting a particular affiliate product.
I will then examine the commission rates and payment structures closely, as they directly affect income. A program that offers a higher percentage per sale, or a lucrative cost-per-action (CPA) model, often gets my attention.
Relevance Is Essential
Next, I assess whether the products or services align with my niche and resonate with my audience. Relevance is a key factor. There’s no point in promoting items that my audience has no interest in, regardless of the commission. It’s very important to keep to keep within your niche, however tempting a high commission product may look.
For example, you have a website promoting men’s clothing and suddenly find a product like a laptop that will give you a good commission. This is irrelevant to your niche and will put potential customers off your website.
The quality and reputation of the program’s offerings are non-negotiable. I seek out products that I trust and would use myself. In this way, it maintains my credibility and ensures I’m recommending something of value.
Support can make or break an affiliate’s effectiveness. I look for programs that offer solid support such as promotional materials, training, or customer service. These resources can simplify the marketing process immensely, especially if you want repeat business.
I also scrutinize the terms and conditions for any red flags, such as unfavourable cookie duration or high payment thresholds. These can limit earning potential or delay access to my commissions.
Considering these factors, I’ll transition into an overview of the top affiliate marketing programs that meet these criteria. These programs not only talk but also walk the walk, delivering on promises and empowering their affiliates to succeed.
Top Performing Affiliate Marketing Programs
If you’re searching for outstanding affiliate marketing programs, you’re in the right place. I have tried numerous options to highlight programs that stand out due to their reliability, user-friendly interfaces, and the potential for affiliates to earn meaningful income.
Amazon Associates
Amazon Associates used to be the most recognized affiliate program today. Its vast product range means almost any niche can find products to promote. The interface is intuitive, and they used to offer up to 10% in commissions, which is competitive considering the breadth of available products. However, despite the huge range of affiliate products that Amazon contains, I wouldn’t recommend Amazon any more.
We all know that whenever we want to buy anything online, especially if it’s slightly unique, we generally end up looking at Amazon. I guess it’s a bit like the term “Google it”, if we don’t know the answer, we can ask Google! However, due to Amazon’s success, over the years, the affiliate commissions have been reduced. I also believe that Amazon is making it harder and harder for its affiliates to make money online.
When Covid arrived in March 2020 and we were locked down and many shops were closed, Amazon decided to reduce its commission rates to its affiliates. I think this was a very unfair practice as Amazon knew full well that they would be making a lot more sales due to people being at home and many shops being closed.
Recently, Amazon also changed the way that you can display photographs on your site. Once again, this makes it more difficult for affiliates. So, overall, I would not recommend the affiliate program. I must admit I haven’t used Amazon’s affiliate program for some time. Some people may disagree with me, but this is how I see it.
ShareASale
ShareASale boasts a robust selection of merchants, spanning various industries from fashion to technology and everything in between. I am member of ShareASale and have been for a number of years. If you’re based in the UK, you may just have to fill in a very simple online tax form declaring that you are not operating a business in the United States.
What makes ShareASale appealing is the straightforward sign-up process and a dashboard that’s simple to navigate. ShareASale stands out for its timely payouts and strong support system for affiliates. ShareASale is part of the AWIN group which we will look at shortly. You can find out more about ShareASale here.
ClickBank
ClickBank specializes in digital products, which often have higher commission rates than physical goods. They also have the advantage that you can simply download the products immediately. Affiliates in niche markets will appreciate the mix of of products available. The platform is known for regular payments and offering some of the best commission rates, which can reach up to 75% on certain products. You can see ClickBank products and sign up here.
CJ Affiliate
I believe that CJ Affiliate was probably the first affiliate program that I signed up for in the early days. CJ Affiliate, once known as Commission Junction, commands respect in the affiliate marketing world. It prides itself on reliable tracking technology and a wide network of big brands. While it has a steeper learning curve, the potential payouts make it worth the effort for dedicated affiliates. I am still a member of CJ affiliate today. You can see their website here.
Rakuten Marketing
Rakuten Marketing is ideal for those looking to provide a personalized advertising experience to their audience. They’re known for excellent customer service and an expansive network of advertisers. This program might require a bit of learning, but the tools for success are all there.
Webgains
Webgains is another affiliate platform that I have been a member of for many years. They started in the UK and have since expanded into other countries, including the USA. They have recently changed their dashboard for a much clearer interface. One of the good things about Webgains is that you can have multiple accounts within one account. Let me explain this. It’s important to track every website that you own, as it’s important to know where your commissions are coming from. So, with Webgains, I can create an account for each website, so I know exactly which websites are making commissions. You can create an account at Webgains here
Awin
Lastly is Awin, a global affiliate network that’s rapidly growing in popularity. I would say that Awin is probably the largest affiliate program and has the widest range of affiliate programs available. With an impressive list of advertisers and an easy-to-use interface, Awin is an excellent choice for affiliates of all levels. They are known for their fair commission structure and consistent payment schedule. You can find out more about Awin here.
Maximizing Your Success with Affiliate Programs
The key to success with affiliate programs is really about being consistent. If you think of a shop owner who kept their shop window the same throughout the year, people probably wouldn’t enter into the shop. It’s the same with our website; we need to keep adding fresh content and products to keep our audience engaged.
Focusing on providing insights and solutions that meet your audience’s needs will position you as a trusted resource. Consistency is key. Regular updates with fresh and relevant content will keep your users coming back for more. This is why I use Datafeedr to populate my website with products. It takes the hard work out of adding products to a store.
Employing search engine optimization is a non-negotiable tactic. Smart keyword research and SEO practices increase your content’s visibility, driving more organic traffic to your site and more potential for affiliate revenue. Although the above is important, I believe that writing fresh content is more important. I think sometimes website owners get hung up on SEO and actually try to hard. Whereas, if we just write decent and truthful content, it’s amazing where this can take us. In other words, do not overcomplicate the process of building your online business.
Trust is the cornerstone of any successful affiliate marketing endeavour. Always remember to disclose your affiliate relationships and only promote products you genuinely endorse. Your audience’s trust is far more valuable than a quick commission.
Lastly, don’t merely set and forget your affiliate marketing efforts. Use analytics tools to track which strategies work and which don’t. Test different approaches, tweak your methods, and adapt based on results. Continuous optimization and adding regular content is the engine of sustained affiliate success.
In this video and blog post, I would like to show you how to build a WordPress website and data feed in under 20 minutes. And at the same time add a data feed to the website which will automatically add new products to your website.
In the video, you can see one of my websites that is populated with around 8000 various products that are all categorised. A data feed allows me to import various products onto a WordPress website. You can see that in the video I have many different product sets of various products.
You see that I have added various plug-ins to my WordPress website. These plug-ins include various Datafeedr plug-ins and the WooCommerce plug-in which can all be downloaded.
Let’s Build Our WordPress Website
You can see that I am at my homepage on the Wealthy Affiliate platform. I’ve been a member of this great platform for over seven years now. I guess I will probably be a lifetime member! The platform allows you to build many websites and host them on the platform. I have some websites hosted on the platform and larger websites hosted on a dedicated server.
So, if we click on websites and then we have the option to click on build a website. I am then asked what type of website I would like to build. I’m going to go for the option of going for a domain that I own as I have already purchased a domain of my own. If you haven’t purchased a domain, you can find great prices for domains and hosting here.
We then have the option to choose a domain name for a website, I will put in firstclassmodelrailways.com. We don’t need to add https or www. This is a domain that I purchased earlier. We then need to enter a title for our website. Don’t worry if you can’t think of a title, just put something in as it can be changed later.
Build A WordPress Website
We are now ready to choose a theme. There are loads of themes available which can make it very confusing. As you can see in the video there are 4721 available themes. I have saved a few favourites, the great thing is a theme can be changed at any time. Just make sure that your website is backed up before you change a theme. Also when you’re choosing a theme make sure and check out the reviews to see that the theme is still supported.
Build Your Website
We can now click on the build our website button and hopefully, after around 30 seconds the website will be built! As you can see our website is now built, it really is an amazing way to build a website quickly. We can now log into our website through the Wealthy Affiliate platform by going to websites.
We are now ready to install Datafeedr. There are some people that say you need to do various things with your website first. For example, hello world, sample page etc. However, I like to install Datafeedr on my website quickly so that I can start adding products to my website instantly.
Let’s Get Ready To Install Datafeedr
We need to log in to our WordPress website and in the dashboard, we then need to go to settings and then a general. Most of the settings can remain the same, I am going to add a tag line and keep the same as the site title. Check your language is set to the correct country, I will set mine to English UK.
I will now set the time zone to London GMT. We can choose which date format we prefer which is obviously a personal preference. I prefer to have my week starts set for Sunday, once again that’s personal. Of course, we must make sure and save our changes. More changes can be made at any time, however, I like to do these small changes before I get started properly.
It’s Time To Install The Plug-Ins
If we now go to the plug-ins section on add dashboard and click add new. We can then carry out a search for the WooCommerce plug-in. Once you start typing the plug-in should appear, the plug-in we want is the WooCommerce plug-in by Automatic. We can now click on install now.
Now we need to search for our Datafeedr plug-ins, type in Datafeedr to the search box and the plug-ins will appear. The four plug-ins we need are Datafeedr WooCommerce importer, Datafeedr API, Datafeedr product sets and finally Datafeedr comparison sets.
We can now click on the install now button on each of the four data feed plug-ins. Once all the plug-ins are installed, we can now go to installed plug-ins and activate our five plug-ins.
You can see in my installed plug-ins that I have the SEO framework; this is something that I don’t use. I actually use the Yoast plug-in for all my websites. It’s something that I have used for years and as far as I know, it’s the most popular SEO plug-in. I see no point in changing a plug-in when it’s working perfectly fine. It appears that people are enjoying the SEO framework plug-in. I just like to stick with what I know, it takes time to learn various different types of functionality!
Installing The Plug-Ins For Datafeedr
WooCommerce Settings
WooCommerce seems to update its settings quite regularly so you may see something slightly different to what I am seeing! As we are selling affiliate products and not physical products many of the settings do not need to be activated or filled in.
Here I am going to my country which is the UK, there are quite a few countries to go through. I will also add my address. You will probably get a table come up which asks which industry you work in. Just find something that is appropriate to your niche. In my case, I’m going to put home as it’s a hobby. The next box to appear is what type of products will be listed? I’m going to put downloads as I will be using affiliate products. And then finally how many products there are going to display, I’m going to go for a 1000 plus.
WooCommerce may ask you what theme you want to use I will continue with my active theme. For Datafeedr, there are a lot of questions that WooCommerce asked which do not apply. Just skip over some of these questions, the majority of the questions are if you have a physical store.
I’m going to go in my WordPress dashboard to WooCommerce and settings. Here we can add our address and check our currency, once again, most of the settings can be left untouched. We then need to save settings.
WooCommerce Settings
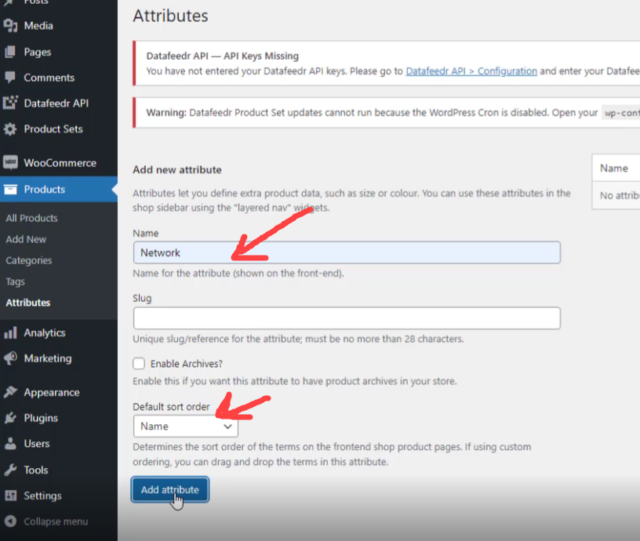
Product Settings – Attributes
We are now going to go in our WordPress dashboard to products and then attributes. We are going to add a new attribute, the first attribute is network. And then we need to change the default sort order to “name” this is in the form of a drop-down menu. We now need to click on add attribute which will save settings.
The above process must be carried out three times. So, the second attribute is going to be “Merchant” and custom ordering. And finally, the third attribute will be “brand” and custom ordering. Once again, we need to save our work by clicking on “add attribute”.
Product Settings – Attributes
You Need To Enable The Cron
You will probably see a warning message at the top of the page telling you that the Cron is disabled. This is totally normal, in my case I will have to contact my hosting provider to tell them to enable the Cron. Depending on what type of hosting you have you can enable the Cron yourself. However, in my case, I will have to speak to my provider to turn it on. The data feed cannot function without the Cron being turned on.
You Need To Enable The Cron
Datafeedr API Configuration
It’s now time to configure our Datafeedr API, you can see at the top of the page that WordPress is telling us we need to configure our data feed API. We can either click on this or go to Datafeedr API and click on configuration.
We now need to add our API access ID and our API secret key. This is something that receive when we pay for the Datafeedr software. There is a link that will show you where your data feed API keys are. They can also be found in your signup email.
AWIN Settings
Below the API secret key you can see that there are AWIN settings, for this website I will not need Awin. However, if you do there is a link that shows you how to find your AWIN settings. Once again, we must make sure and save our changes!
Datafeedr API-Networks
We now need to set up our Datafeedr API networks. Once again we need to go to our WordPress dashboard, and then go to Datafeedr API and then networks. There are many different networks that you can add, I’m going to add ClickBank to start off with. We then need to tick the ClickBank box as shown in the diagram and add our affiliate ID.
In my case, I’m just going to add two networks. You can come back at any time to add further networks. I’m still waiting for an application to come through from one of the networks so I will come back later and add the extra network. We need to save our changes when we have finished adding our affiliate ID’s.
Before you can add any of the networks you do need to create an account with all the various networks you require. Without signing up for new networks it’s impossible to add your affiliate ID.
Datafeedr API-Networks
Datafeedr API Merchants
We now need to go and select our merchants. I will go to the WordPress dashboard and Datafeedr API and then merchants. You can see the two merchants that I have added ClickBank and Paid On Results. In ClickBank we only have the choice of one merchant, so I will click to add, you can see that as selected merchants have been added.
The same process is repeated with other merchants. You only need to add merchants that you are going to use. You can see that in Paid On Results there are many merchants available. We only need the merchants that are appropriate to a niche. In my case, none of the merchants are appropriate for my niche. We also to make sure that we are signed up to the various merchant’s affiliate programs. This is important otherwise we will not receive commissions.
Select Merchants
Adding Product Sets
I can’t show you how to add a product set in this video as Cron is not enabled. However, I do have a video and instructions on how to add product sets. I will just open up the product sets for the sake of this video to show you what to do.
So, let’s go to product sets and add a new product set. We can then give our product set a title related to the products that we want to import. The title can always be changed at any time. We would then go and carry out a search for the associated products. You can find the video on creating product sets here.
To Conclude
I have been using Datafeedr for several years now. I find that a data feed is a great way of adding product store website and keeping everything up-to-date. Datafeedr will remove all products and add new products automatically once you have the software set up.
The first thing I do when I create a new website is to install Datafeedr and then start adding products. I can then blog to various products within the website without having lots of affiliate links on my page.
In this blog post and video, I would like to show you how to add product categories to the sidebar in WordPress. WordPress comes with default settings so when we first set up our website we are able to personalise it. There are many features that can be removed and added according to what we prefer. Adding product categories to the sidebar is a useful feature.
Take A Look At My Video On How To Add Product Categories To The Sidebar In WordPress Or Read The Description Below With Diagrams
Let’s Go To Widgets
So, in our WordPress dashboard, let’s go to appearance and then widgets. First, I would like to show you how to remove unwanted blocks, I have already removed mine. However, I will show you the example of the search block. which I will leave in place as it is a useful feature. If we click on the arrow, we can see the search bar is displayed, I want to keep the search bar. If I wanted to remove the search bar or anything else, all I need to do is to click on delete and the search bar will be removed. The great thing is that anything that we remove can easily and quickly be put back in place.
Remove A Block
Product Categories
So, we are in widgets, if we scroll down we can see “product categories”. Click on the arrow and you will see a list of different widgets. Click on the sidebar and then click on add widget.
Add Widget
Now on the right-hand side of the page, we can see product categories. We have a few options, this is personal, however, I will tick the box “show hierarchy” and “hide empty categories”, there is no point in showing empty categories for obvious reasons! We then need to save product categories and then click on done before we leave the page.
Click The Appropriate Boxes
Moving Product Categories
We can move the product categories or any of our widgets by clicking on the block and dragging them up and down. The blocks are automatically saved.
Now if we refresh our homepage, I have two tabs open in WordPress. One for the front end of the website and one for the dashboard. We can see that dog beds and dog leads are now in product categories in the sidebar.
I will be adding more product categories at a later date by using the Datafeedr software. The product categories will automatically be added to the sidebar.
Product Categories In The Sidebar
To conclude
WordPress has changed dramatically since it first came out in 2003. It’s amazing what we can do with a simple WordPress website.
If you would like to know more about how I started in Internet marketing. Have a look at my getting started page and my top recommendation for starting an online business? I first started working online back in 2004. You can find out more about me here.
Today I would like to show you how to create menus in WordPress. Over the past few weeks, I have been creating the process of building a WordPress website complete with a Datafeed. You can see previous posts or you can go to my YouTube channel to find more videos.
Watch The Video Below To See How To Create Menus In WordPress
Creating Our First Menu
Here I will show you how to create menus in WordPress. As you can see in the screenshot, we are going to remove the top-level menu. You can see the diagram below.
Remove The Top Menu
So let’s go to our WordPress dashboard and then click on appearance and then menus. We will then create our first new menu, I’m going to call the menu name, “main menu”. We will then click on the main navigation and then click on create menu. Make sure that you save the menu before you click away.
Remove The Top Menu
We can now see that our menu has now gone and we can start afresh.
Menu Items Removed
Screen Options
We now going to go back to our WordPress dashboard and in the right-hand corner at the top, we can see screen options. If we click on screen options, I will then click on product categories and product tags. You can then close this window by clicking on screen options.
Screen Options
Creating Product Categories
We are now heading back to the WordPress dashboard again and going to appearance and then menus. We will now create some product categories. So, in pages, let’s click on the view all tab and then select, shop, basket, checkout, my account. We are then going to click on the add to menu button, you will then see the items that have been added to the menu.
Add To Menu
Now we need to move down to product categories which are just below pages. In product categories it is showing the most used tab, let’s click on view all. I will click dog beds and dog leads and then add these categories to the menu by clicking the add to menu button. I will also drag dog beds and dog leads below the shop category. We then need to save the menu. Once again make sure it save before you move away from the page.
Product Categories
Drag Items Into Order
Now if we go back to the front page of our website and refresh it, we can now see the main menu.
We Can Now See Our Menu
Creating A Footer Menu
Once again we are going to dashboard, appearance and then clicking on menus. If we go towards the top of the page we can see there is a create a new menu button. Let’s click on there and create a new menu.
We now need to name and menu so I will call it the footer menu. I will then click below and click footer navigation and then create menu.
Create A New Menu
Now in the pages menu, we are going to click on view all and then select all and then add to menu. You can now see that dog lead and dog beds have been added to the footer menu. We can move the menu by dragging them up or down depending on where you require them. I also then click automatically add new pages to this menu. By doing this it will automatically add a new category to the top level. We then now need to save our menu.
Add Our Product Categories
Add New Top Level Pages
Now let’s go to the front page of our website and see that the menu is not there yet. However, once we refresh a page the menu will appear.
Footer Menu
To Conclude
I’m going to stop here as I think this is enough for one video or one lesson, I will be doing more follow-up videos shortly.
I’m here to help so if you have any questions to ask please click on the YouTube comments and leave your comment there. I do try and answer all comments and questions.
In the video and blog post today, I would like to show you how to backup a WordPress website. Over the past couple of weeks, I have been building a website from scratch and documenting the process.
So far I have created several videos that show the Datafeedr setup. So today I would like to show you how to use Updraft Plus to back up a WordPress website.
Creating a backup on any website is one of the most important things we can do. It’s very easy to break a site, so therefore, by creating backups we can quickly get back to where we started.
Watch The YouTube Video To See How To Backup A WordPress Website Or See My Scripted Version With Diagrams Below The Video
Installing Updraft Plus
We need to go to our WordPress dashboard, then go to plug-ins and install new. In the search bar, type Updraft Plus and you will see the Updraft Plus backup plug-in. We can now click on the install button and then once it’s installed we can click activate.
Go To Add New Plug-In
Activate The Plug-In
We are now automatically taken to the plug-ins page, which are displayed alphabetically. If we go to Updraft Plus, I will click on take a tour to show you the features of the plug-in.
Take A Tour Of Updraft Plus
Updraft Plus Settings
First of all, we will see a page that you can see in the diagram that shows all the places we can back up to. The files backup schedule and the database backup schedule are both set for two backups. The reason I do this is so that if any backup becomes corrupted, we still have a secondary backup. I personally use Microsoft One Drive and Google Drive, there are many other choices.
Take A Tour
Let’s now click on the next button; this will give us the opportunity to try the Up Draft Vault. To be fair, I don’t use this facility, however, for one dollar a month it may be worth thinking about.
Choose Your Backup Schedule
Moving on we have some exclusion settings. For example, if you have lots of photographs you may not necessarily want them backed up every time. I am going to leave my settings in the default mode.
Finally, we need to save our settings. You can see in the video that we are offered a couple of upsells. The first one is Updraft Central and the second one is Updraft Plus Premium. Personally, I don’t use any of the premium products, however, I do believe they are pretty good products.
Let’s Now Carry Out A Backup
Now it’s time to carry out a backup. If we go to the backup/restore tab and then click on backup, as shown in the diagram. Once again, I leave the settings in the default mode, we can now backup our WordPress website.
Backup Now
A website backup doesn’t normally take very long, it does depend on your hosting provider and how good your hosting is. In this case, I’m using some free hosting from a platform that I belong to and recommend. Basically, this is a membership site that features everything about Internet marketing. One of the bonuses they offer is free hosting, which is actually pretty good. I do have a dedicated server for more established websites that receive a lot of traffic.
Updraft Plus also enables you to be able to download a backup to your computer, which I recommend. If you click on the database and then a few moments later, you will see a button appear that says download to your computer.
Back Your Website Up To Your Computer
If you have any questions regarding carrying out a backup, please leave a comment on my YouTube video above.
To Conclude
I have several websites which I keep continually backed up. I have found Updraft Plus to be an excellent free tool for keep my websites up-to-date.
In this video, I would like to show you how to restore the classic WordPress widget. I have created a video below that will take you through a the process to restore the classic editor in WordPress. Alternatively, I have written out the process with diagrams, below the video.
How To Restore The Classic WordPress Widgets
Over the past week, I have been documenting the process of installing a WordPress website. I’m also showing how to install Datafeedr onto a WordPress website.
So I am in my WordPress dashboard, we need to scroll down to appearance and then click on “widgets”. As you can see, the new widget layout is completely different to the classic WordPress widget. In fact, I do not have the time to find out how to use the new widget now. So, to save time I will show you how to install the classic WordPress widget.
Go To Widgets
The New Look WordPress Widget
Classic widgets
Let’s go to the plug-in area in a WordPress website. If we go to, “add new” and type in the search box, “classic widget” you can see that there are various plug-ins available.
The first two plug-ins catch my eye, however, looking deeper, I’m going to go for the plug-in with 800,000+ installations and 180 reviews. I guess both plug-ins work well, however, I have more confidence installing the plug-in with more reviews and more installations.
The Classic Widget Plug-In
Installing The Classic Widgets Plug-In
I will now click on “install now” within the “classic widgets”. Now the classic widget is installed I can now click on, “activate” to activate the plug-in.
Install The Classic Widget
Let’s go over to the other tab where I had the widgets page open. I will refresh the page and we should then see the classic WordPress widget.
How To Restore The Classic WordPress Widget
If you have any questions regarding this video, please comment on the above YouTube video, as I would be pleased to help.
How Would You Like To Work Online?
I’ve been working online since 2004, many people do not understand the power of the Internet. It never fails to amaze me what can be achieved online. If you would like to know more about working online, take a look at my “getting started page” to find out more. You can also find more about how I started online here.
In this video, I want to show you how to create a subdomain for affiliate links. Subdomains are great for promoting affiliate programs. So for example, I am going to create the subdomain datafeedr.roybrettononline.com. My website address is roybrettononline.com, so I am just adding the word “datafeedr” to my domain name. It’s a very straightforward task to create a subdomain, I will explain everything in the video.
The advantage of putting an affiliate link into a subdomain is that you can remember your affiliate links easily. And of course, it’s much better than having lots of letters and digits etc. within your affiliate link.
You Can See My YouTube Video On How To Create A Subdomain For Affiliate Links Below
I Am In My Own Go Daddy Reseller Account
I’m in my own Go Daddy reseller account which enables me to buy and manage my own domain names. I will click on the required domain, which in my case is roybrettononline.com, I then scroll down to where it says; “Manage DNS”. Sometimes Go Daddy accounts may vary slightly on how they look, however, the principles are all the same.
Manage DNS
Creating A Subdomain For Affiliate Links
Once you have clicked on “Manage DNS” it will take you to the next page where you will see a box on the right-hand side that says; “Forwarding”. Now we don’t want domain forwarding, we need to go to where it says; “Add” subdomain.
Forwarding
In the subdomain box, like the name of what you want your subdomain to be. So, for example, you can see above that I have two subdomains, the first one being datafeedr and the second one being TechSmith.
In the forward box, write your affiliate link and make sure that the link is correct and unique to you. Also, make sure that you haven’t added the “https://” in your actual affiliate link as there is a drop-down menu to carry out this action. If you don’t do this part properly, your affiliate link and subdomain won’t work properly.
You can check that the affiliate link is working correctly by clicking on the preview button, make sure that your affiliate link is going to the correct page.
We then need to go and save our subdomain by clicking on the save button. Once we have saved a subdomain we can test it by pasting the domain into a search bar to check that it is working correctly.
Add Your Affiliate Link
If you have any questions or comments please try and comment on the youtube platform.