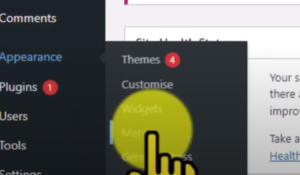
In this video and blog post, I want to show you how to create Menus in WordPress 2024. So I am on one of my websites here; you can see that I have on my top navigation bar home, about me and privacy policy. I’m going to show you how to create and add some posts to the menu. I have previous videos and blog posts on creating menus here. You can see my video of how to create Menus in WordPress 2024 below.
Let’s Navigate To The Dashboard
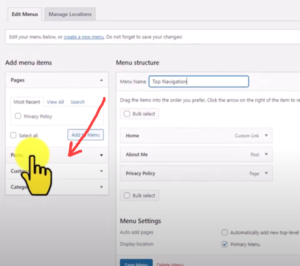
You obviously need to be logged in to be able to get to the WordPress dashboard. Once you are logged in, if you navigate to appearance and then to Menus, this will take you to the required area. You can see the existing menu that I have already created. I’m going to change the menu name to “Top Navigation”.
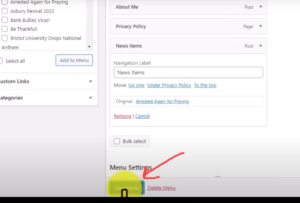
We need to go to the area on the left-hand side of the page that says posts, as we are currently on pages. I’m then going to “view all”. I’m going to then check the post called “arrested again for praying” and I will then click on add to menu. You can now see that this has been added to our menu structure. I want to change the name, so if we click on the arrow, it will enable me to rename the category within the menu. I can change this to “News Items”. The menu can now be saved.
Let’s Navigate To The Dashboard
Sorting The Menu
We can sort the menu to any order that is required just by left-clicking on any menu and then dragging it up or down, depending on where it is required. Once again, you need to save the menu once you have sorted the menu. So will now go back to posts and view all. I’m going to add another post to my menu. Let’s use “Bank Bullies Vicar”, I’m going to click on the add to menu button, which will immediately put it with my other menu categories. I’m going to drag “Bank Bullies Vicar” slightly to the right, which will make this item a subcategory of “News Items”. Let’s do exactly the same with another blog post and make it a subcategory of “News Items”. Once again, I can click on “News Items” and drag it to whichever position I prefer.
Click On Posts
Let’s Create Another New Menu
I’m going to create another menu item now, this one will be called “Devotionals”. Once again I can change the name of the menu category to whatever I want. I can move the “Devotionals” to wherever I want to within the menu and so forth. Once again, I need to save the menu.
Don’t Forget To Save The Menu
Let’s View Our New Menu
So let’s now go back to the website and have a look at the menu navigation. As you can see, nothing has changed yet, as I have the website open in a different tab. However, once I have refreshed the website, the menu will appear. You can see the new menu and the drop-down menus that have more than one post attached to them.
New Navigation
To Conclude
The menu can be changed at any time, you can remove and add and reposition the menu, just through a few clicks. If you have any questions, please feel free to comment on the YouTube video, I do try and respond to questions.
In this video, I would like to show you how to create custom menus in WordPress. In the previous video, we were talking about how to create our first website content.
Before I start, I just want to take you to the Wealthy Affiliate platform, which is where I build my WordPress websites. You can see here that this is my home page or profile page on the platform. I have been a member of the platform for eight years, in fact I’m just starting my ninth year.
The Wealthy Affiliate platform teaches you how to build an online business, even if you know absolutely nothing. The platform takes you through the complete process from start to finish. There are over 2 million members; I appreciate that they are not all active. However, it does prove how popular the platform really is.
How To Create Custom Menus In WordPress
Once again, I’m on the Wealthy Affiliate platform, as that is where I host my WordPress website. The hosting is something that’s included within the Wealthy Affiliate platform if you are a paid member. I’m going to click on the website tab; this takes me to my recent website logins. I’m going to then click on a countrymans view, which will enable me to log into my website. You can log in to your website in a different way, however, as my website is hosted at Wealthy Affiliate, it’s easy for me to log in through the Wealthy Affiliate platform.
Go To Appearance
So, as you can see, we have the dashboard menu on the left-hand side; I am going to scroll down to appearance and then click on menus. So here you can see that we have a menu structure, which is currently called menu one. You can see that we have our home page and our privacy policy within the menu. If we go to another tab where I have the front end of the website open. You can see that we have a privacy policy in the top right-hand corner, and then on the home page, we can see my about me page.
We will now go back to the dashboard and to our menu. You can see that on the left-hand side of the page, we are in pages. Within pages, we can see our privacy policy, as in my last video, we created the privacy policy in pages. If we come down the page, we can see that our next heading is posts. Within posts, we can see the about me page, which I uploaded as a post, in the previous video.
Below the posts, we have custom links and categories, I’m not going to look at these two sections today as I want to keep the video simple and straightforward. I will create another video at a later date to explain more about the categories and the custom links etc.
Let’s put a checkmark on the about me page and add it to our menu. Now just click on the “and to menu” button, and you can see it is added to our main menu. You can see the about me page below our privacy policy. We can move the various pages up and down by clicking on the icons and dragging them up or down.
Name Our Menu
You can see that by default, the menu is named as “menu one” I’m going to change that to “main menu”. This can be changed at any time if you want to change the menu name. I’m also going to click on the primary menu below; I will then click on the save button to save our menu.
Now we are going to have a look at the front page of the website. Here you can see on the main navigation menu we have a privacy policy, about me and home. The menu can be extended at any time and run along the navigation bar.
Changing The Order Of Our Menu
We are now returning to the dashboard again. If we want to move one of the menus, we can drag it up and down, as I mentioned earlier. Or we can create a subcategory by moving it slightly to the right. We now need to save our menu before we leave the page.
So now we are going to go back to the front end of the website again; we need to refresh the page. Now you can see that below we have the privacy policy, we have about me and then our homepage button to the left. I’m not going to leave the menu like that; it was just a demonstration to show how easy it is to move the menu around and create subcategories.
I will now put the menu back to how I want it, and then once again, we need to save our menu. Normally if you forget to save the menu, WordPress warns you not to leave that page until you have made the necessary changes or clicked on the save button.
Widgets
Now that we have completed the menu training, we will have a quick look at the widgets area. As you can see, we are still in appearance and we just need to come up one level to the widgets section. You can see all the various widgets that are available, they can almost be placed wherever we want.
If you have a look at the front page of our website, you can see the various widgets. First of all, we have the search bar, then we have the recent posts and finally, recent comments. These can be moved around and the order can be changed by going to our dashboard and to the widgets section.
Widgets Everywhere
You can see that there are widgets for the sidebar, header, footer area, footer bar etc., the list goes on. I will talk about the widgets more later on; this is just really an introduction to what the widgets offer.
You can see our widgets that are in use now we have recent posts and recent comments. We can add a button text and various other labels etc.
If you have any questions about how to create custom menus in WordPress or you think that I can help with something, please contact me here.
To conclude
If you would like to know more about the Wealthy Affiliate platform, you can sign up for a free account here. There is no need for a credit card to be used for the free starter account. The free starter account does exactly what it says, you can test the system to see that you are satisfied. I actually immediately went to the paid membership as I was already working online. I could see that the platform was very impressive. However, it’s good to check out the free starter account with no obligation, you can always move up to premium level or premium plus level, at any time.
Today I would like to show you how to create menus in WordPress. Over the past few weeks, I have been creating the process of building a WordPress website complete with a Datafeed. You can see previous posts or you can go to my YouTube channel to find more videos.
Watch The Video Below To See How To Create Menus In WordPress
Creating Our First Menu
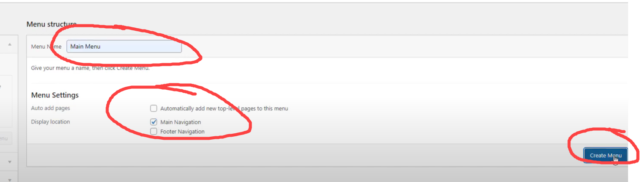
Here I will show you how to create menus in WordPress. As you can see in the screenshot, we are going to remove the top-level menu. You can see the diagram below.
Remove The Top Menu
So let’s go to our WordPress dashboard and then click on appearance and then menus. We will then create our first new menu, I’m going to call the menu name, “main menu”. We will then click on the main navigation and then click on create menu. Make sure that you save the menu before you click away.
Remove The Top Menu
We can now see that our menu has now gone and we can start afresh.
Menu Items Removed
Screen Options
We now going to go back to our WordPress dashboard and in the right-hand corner at the top, we can see screen options. If we click on screen options, I will then click on product categories and product tags. You can then close this window by clicking on screen options.
Screen Options
Creating Product Categories
We are now heading back to the WordPress dashboard again and going to appearance and then menus. We will now create some product categories. So, in pages, let’s click on the view all tab and then select, shop, basket, checkout, my account. We are then going to click on the add to menu button, you will then see the items that have been added to the menu.
Add To Menu
Now we need to move down to product categories which are just below pages. In product categories it is showing the most used tab, let’s click on view all. I will click dog beds and dog leads and then add these categories to the menu by clicking the add to menu button. I will also drag dog beds and dog leads below the shop category. We then need to save the menu. Once again make sure it save before you move away from the page.
Product Categories
Drag Items Into Order
Now if we go back to the front page of our website and refresh it, we can now see the main menu.
We Can Now See Our Menu
Creating A Footer Menu
Once again we are going to dashboard, appearance and then clicking on menus. If we go towards the top of the page we can see there is a create a new menu button. Let’s click on there and create a new menu.
We now need to name and menu so I will call it the footer menu. I will then click below and click footer navigation and then create menu.
Create A New Menu
Now in the pages menu, we are going to click on view all and then select all and then add to menu. You can now see that dog lead and dog beds have been added to the footer menu. We can move the menu by dragging them up or down depending on where you require them. I also then click automatically add new pages to this menu. By doing this it will automatically add a new category to the top level. We then now need to save our menu.
Add Our Product Categories
Add New Top Level Pages
Now let’s go to the front page of our website and see that the menu is not there yet. However, once we refresh a page the menu will appear.
Footer Menu
To Conclude
I’m going to stop here as I think this is enough for one video or one lesson, I will be doing more follow-up videos shortly.
I’m here to help so if you have any questions to ask please click on the YouTube comments and leave your comment there. I do try and answer all comments and questions.
In this video, I would like to show you how to use Snagit to screenshot a drop-down menu. This can apply to all different types of drop-down menus. In this example, I am using the Windows 10 emoji window.
In case you don’t know what Snagit is, Snagit is a great tool for taking screenshots, which is generally what I use it for. However, you can also create screenshot videos and more. I also recommend Camtasia, both tools are manufactured by Techsmith. Snagit is the cheaper tool if you are just starting out, but with slightly less functionality than Camtasia.
The problem with Snagit is that if we are trying to take a screenshot of a drop-down menu or something similar. As soon as we click onto Snagit the drop-down menu disappears.
You can watch my video below or see the script below that I have written with diagrams.
Turn On Time Delay
To take a screenshot of a drop-down menu we need to turn on time delay. You can see the diagram below. I am going to click on time delay, I then must turn time delay on. And then we have an option to set the time delay, I will set this for 10 seconds. Originally, I set the time delay for five seconds, however, this was sometimes a bit too quick for me to bring up the emoji window. The settings can obviously be changed at any time.
Turn On Time Delay
Now Capture An Image
Now that we have our delayed time settings set, we are now ready to take a screenshot. In normal terms for just doing general screenshots, we can just use Snagit in the normal way. But for capturing a drop-down menu or like the emoji window we need the time delay.
Now we need to click on capture, drag our mouse over into the window where we want to take the screen capture. I will then bring up the emoji window by pressing the Windows key and full stop key. We can see the countdown timer counting down and once it reaches zero seconds, we are ready to capture the area that we require.
Click Capture
We can now see that the image can be found in the Snagit editor. Once the image is in the editor, we can make the image a different size or just crop it. Of course, we can use the other features that Snagit offers, but that’s for another video.
Open The Snagit Editor
If you have any questions about this video, please comment on the YouTube video.
Working Online
I’ve been working online since 2004, however, I have been in business since 1983. If you would like to find out how to work online and start an online business. Take a look at my “Getting Started Guide”. You can also find out more about me here.
How To Change A Page To A Post In WordPress – And Vice Versa
Today, in my video, I want to show you how to change a page to a post in WordPress – and vice versa. I think we’ve all done this; we’ve written a post or a page, and we have meant to put it, perhaps, as a post, but we put it in as a page. I generally write posts rather than pages, but occasionally, for some reason, I’ve just written it as a page. You can see my previous blog post about Google’s core update here.
Now, there are two ways of doing this. There’s one way that looks quite good, but the way I normally do change a post to a page or vice versa, which I think is probably the easiest way, I will show you in a minute. So, if we go to our plugins page here, and here you can see that I have typed in “post type switcher,” which you can see has come up here. Basically, I’m in plugins and I’ve gone to add a new plugin and then typed in “post type switcher.” And then, if we click here, it gives us some more information —I always like to look at the ratings.
You Can See The Video below On How To Change A Page To A Post In WordPress – And Vice Versa
Use A Plug-In
Use A Plugin
There are two things I look at: ratings and to check that the plugin has been updated recently. Also, it’s important to make sure that it is compatible with your version of WordPress. Now, there are 13 one-star reviews but there are 215 good reviews, so nothing in between, funny enough, which sounds good.
And here, it looks very simple. You’ve got a drop-down menu, and you can just simply switch it over. I must admit, I try to avoid having too many plugins, but this certainly looks like a good way to to change a page to a post. However, let’s come back to the way that would normally change a page to a post.
Copy And Paste In Text Mode
So, let’s have a look at this post here. Take this post here, “Why Your Website Should Be Your Priority, Not Social Media.” So, I am in edit mode here, so I’m in “posts,” “all posts,” I’m in this post here. So, I’m going to go to—at the moment, we’re in visual, but I’m going to go to text, and then I’m going to put the mouse here, going to highlight it, and then I’m going to copy.
Now, let’s open a new, in fact, no, let’s go now to get a page and let’s go to “add new page,” going to paste, and I won’t worry about the title, and then we’re going to go visual, which shows us how the page will look, and then we literally just press publish. Now, I don’t need to publish the page because I’m not going to use this page. But you’ve got everything there, and that seems to work quite well. You have to do it in text mode to change it, copy the text, and then that’ll copy everything over.
To Conclude
I like to try to keep my plugins to a minimum, so the way that I have shown you seems to be a simple and effective way to change from a page to a post or vice versa. Of course, you can always disable the plugin once you have carried out what is necessary. However, copying the page in text format seems to work absolutely fine for me. I have always enjoyed learning new tips and tricks online. One of the places that I recommend for up-to-date training online is a membership site that I am part of. You can see my profile here to find out more about me.
In this video, I want to show you how to carry out basic keyword research. Recently, I started a series on building a web business from scratch, taking you through the process of building an online business. My previous video on the subject, was about how to create custom menus in WordPress. Today, I want to look more at creating and finding keywords. So, I’m on the Wealthy Affiliate platform here. I will put all the links in; you can see my profile. I’ve been a member here for nine years now.
The platform takes you through various lessons, and in this lesson, we’re talking about keywords and finding the right keywords. I believe that some people make keywords a bit more complicated than is really necessary. I don’t think it’s quite as important as it was, especially as your website grows and you get more content. Google starts to find you easier, but I’m going to take you through the process anyway. You can see my video below that shows basic keyword research.
Keywords
So, here we have a tool called the Jaaxy keyword tool. Now, if you’re not a member of Wealthy Affiliate, don’t forget you can set up a free account where you get this free tool. It may look slightly different because I have the Enterprise account, but it gives you enough searches to try it out and experiment and find out if you like it.
So, my website is here; it’s called A Countryman’s View, and it’s basically a Christian website with news, current affairs, and what have you. I didn’t really set it up as a moneymaking website; it’s more of an evangelistic website tool. However, I probably will start monetizing it once I have more content on there. Now, all I have at the moment is an about me page and terms and conditions, but probably in the next video, we’ll start adding content.
So, let’s get back to the search, the keyword search. So, I’ve just put in “Christian books.” Now, this can be anything. Whatever your niche is, the principles are exactly the same. I typed into Google “Christian books,” and here you can see all different sorts of websites and what have you. These are all-natural searches. Let me just click through to see if there are any paid searches. Really, you can see Amazon; and down here we’ve got Audible ads, which is part of Amazon. So, these are often ads at the top and the bottom of the page. But we want to aim to get in the natural search, as we don’t want to pay money to get our website up and running, especially when we’re starting a new business.
Sponsored Ads
So, let me just click on the next page; here, we have sponsored ads. So, here, using the same search, “Christian books,” we have paid ads; you can see that it says ad. There are normally three or four ads at the top, and then we’ve got our natural search. Bearing online, this is on page two, all sorts of different websites. So, to help us get ranked in Google, I use this tool, Jaaxy. As I said, if you’re not a member of Wealthy Affiliate, you can create a free account, which will give you access to some searches using this tool.
So, I’ve put in the search “Christian books.” You can see from one of my other websites I put in “Garden Shredder”; you can enter whatever words relate to your niche. So here, at the top, you’ve got “Christian books” at the top here; you’ve got all these figures. It may not look like anything, so I’m just going to put the mouse across so you can see what it means. So, it says here the average number of searches the keyword receives per month is 11,363 for the term “Christian books.” The traffic estimate to your website, if you achieve first-page rankings in the search engines, is 1,932. QSR quoted search results, the number of competing websites ranked in Google for this exact keyword, which is 169. And then we’ve got the keyword quality indicator: green is great, yellow is okay, red is poor. So, we’ve got normal there. And then we’ve got the SEO, a score based on traffic and competition. The higher the score, the more likely you will rank for this keyword on the first page; it’s a scale of one to 100, higher equals better.
QSR Score
So, I’m going to look at the QSR score here, and let’s look for words or phrases that are under a hundred, so we can find new Christian books and Christian bookstores. Christians bookstores was 21, the Christian bookstore, where to buy Christian books. And then, we can save this to a list here. So, I’m going to put “Christian books,” that’s a new list; save. They’re saved so that we can go to that list at any time.
And then, if we want to perhaps look at, like this word, we can click “wholesale Christian books”; we can bring up more words. We can click on that, which brings out similar words. So, we can find more words, we can create a list, etc. And then, we can find a QSR score which is under 100 and create another list.
I want to keep this fairly simple because I think some people get too hung up on keywords, but the best thing you can do is to start writing. But this, the Jaaxy tool or any other keyword tool, will help to give you ideas of what words you can use. And then, once you get started, there are other ways of finding what keywords are ranking, etc., and you can take it from there.
So, if you’ve got any questions on this video, please feel free to write in the comments section. I’m here to help. Thanks very much for watching.
In this video, I want to show you how to create a website in 90 seconds, or maybe even less. Now, I’ll show you my profile. I belong to a platform called Wealthy Affiliate, which essentially teaches you how to build an online business. I’ve been on the Wealthy Affiliate platform since November 2014, so I’m sort of entering my 10th year now, and I don’t plan on leaving at all. The great thing is there are many features. I’m not going to go into all of the features as I explain that in other videos, but you can host websites here. I do have some larger websites that are hosted on a dedicated server, but for most people, and certainly for starting off, the hosting is absolutely fine. This is a great way of putting up a website really quickly.
Let me take you to this page, which is the homepage. We’re going to go on the top menu here to ‘Websites’ and then to ‘Site Builder.’ Now, you can join this platform for free, but I am a paid member. As a paid member, you get full access to everything. I won’t go into details now about that, but you can sign up for a free membership to test the platform out, and you can also build a free website, which is a way of testing the system. But I’m going to use a domain that I already own. So, we’re going to click on here.
You Can Watch Me Build A Website In 25 Seconds!
Purchase A Domain
It says ‘Register a Domain,’ but I actually have a shop where I sell domains. You can find the link below this video. We offer domains, hosting, email, etc., and more. You’re welcome to just put your domain name in here, your potential domain name, and do a search to see if it’s available. But let’s get back to the website builder.
So, we’ve got a domain that I already own, and we’re going to click here. For the website name, let me just copy and paste the name of the website. The title for the website will be ‘Suffolk Tree Stump Grinding.’ Then, I’m just going to choose the design. Now, there are 6006 themes here, which can be a bit confusing if you’re new. But I’m just going to take the first theme because you can change the theme at any time. Most themes don’t do quite as much as you think. They are just edited by people who have designed the themes, but many themes are very similar. I think people get rather confused and overcomplicate things. As I said, a theme can be changed at any time.
Choose A Theme
So, I’m going to choose the first theme that’s available. Click on that. So, we’ve got the domain name ‘sufftreestumpgrinding.co.uk,’ we’ve got the name for the website—this name can be changed at any time, the domain cannot be changed unless we rebuild another site. The title is ‘Suffolk Tree Stump Grinding,’ and we’re using the theme ‘Generate Press.’ Now, we can click here to ‘Build My Website.’
Watch Your Website Being Built
Now I’ve been going for 3 minutes and 40 seconds. Let’s click here and see how long it takes. It does vary, to be fair, and it might take longer as I’m creating a video. I’m not going to pause the video because I just want to show you how quick and easy it is. There are no technical skills involved; it’s a very simple process, which is something I really like. And if I ever want to move the website, I can.
So, there we go, it’s done. That was 4 minutes 15 seconds, and the website was up in about 25 seconds—not 90 seconds. So we can click on the website here, and there’s our website. Now, obviously, there’s no content on here, but we are now in a position to add content. I’ve got more videos, and I’ll be creating more on what happens when you start a website and how to get going. I already have some videos if you want to take a look.
Learn From The Experts
Basically, the Wealthy Affiliate platform takes you through the entire process of building a website. There’s training, websites, classes, and much more. Even if you don’t know a single thing, the platform will teach you what to do. I’ll also leave a link at the bottom where you can sign up for a free account. There’s no credit card required. But if you want more details on the platform, I have other videos and also on my website, where you can find out more. If you’ve got any questions on this, please feel free to leave a comment and to like this video. Thanks very much for watching.
How To Do More Advanced Product Searches- Datafeedr
Today, I would like to show you how to carry out advanced product searches in Datafeedr. I also have another blog post and video on the same subject but using a slightly different method. I’m deliberately trying to make shorter videos rather than longer videos to make the learning process easier. I’m on one of my websites, where I have the Datafeedr plug-in installed.
Datafeedr Product Importer
In case you don’t know what Datafeedr is, it imports products onto your website, which then enables you to blog about particular products. It’s a quick and efficient way to populate your website with products. You can see the link, which will enable you to purchase the plug-ins. It’s something that I do recommend and it has saved me a lot of time. I guess I have probably been using the product for around five years.
Product Sets
I’m on my WordPress site, I am in the dashboard, and I am looking at the products and in this case, we are looking at the product sets with garden spades. My search term is “spade”, you can see that I already have a saved search of 324 items. I noticed that there are a few rogue products within the search, so I am going to fine-tune the search and remove these rogue products. Due to the way Datafeedr works, it is possible for rogue products to enter into our product sets. However, I will show you a way to remove these products.
Removing Products From A Product Set
I’m now going to scroll down my list of products that I have in this particular product set. I have already checked the first page and that is fine, but now I’m going to check the second page. As I scroll down, you can see that we have come across a Bosch drill bit that has the word “spade” within it, hence why the product is in our product set. This is not the type of spade that I am looking for! If I click on the product title, you can see that it brings down a deeper product description. Looking at the category section, I can see the word “chisel”, so I want to exclude that word.
If we come back to the top of the page, I have the option to add another filter. There are many various filters that can be added to help with various searches. I’m going to use the category filter and the filter to the right is set to “matches”. I’m going to add the minus abbreviation to my search and then I’m going to add the word “chisel”. The minus abbreviation means that I don’t want any products in the product set with the word “chisel” within the product set.
So we have 324 products within our product set, let’s now carry out another search and see how many products will be removed. So you can now see that we are down to 267 products. Let’s scroll down again and check out our product set for more rogue products. I’m going to start looking for rogue products from page 3 as I know that page 1 and 2 are all okay.
On page 3, I have found another rogue product, which is called a spade drill bit set. Once again, we are going to click on the item, which will bring down a drop-down menu. Let’s have a look in the category section and grab one of the words or phrases. I’m going to take the word “drilling accessories”. We now need to come back up to the category section and we need to use the pipe symbol. On my keyboard, and I guess that it is a standard place, it is next to the “ Z” key. It’s also on the same key as the backslash button. Now I’m going to put in the pipe symbol and then leave a space and put in the word “drilling accessories”. With this word, the software will read it as two words, so we need to add quotes to our phrase, so the software can read it as one word.
We can see now that we are down to 267 products, bearing in mind that our original saved search is still at 324. This is because we haven’t updated the saved search as yet. After clicking on search, we are now down to 217 products. I will check the pages again for any rogue products, but I have a feeling that our pages are now clear of rogue products.
Save Your Product Set
Once I have checked the products, I will then click on update saved search and then I will update the product set. We can then bump up the product set if required.
If you have any questions, I am here to help. Please leave any comments or questions in the comments area on YouTube.
Learn How To Do More Advanced Product Searches- Datafeedr
Recently I created a video entitled how to carry out advanced product searches with Datafeedr. There is also an alternative way to carry out advanced product searches. I deliberately try and keep my videos short, the previous video was nine minutes and 40 seconds. I want to try and keep videos short to make it easier to learn.
So, in this video, I will show you another way to carry out an advanced search within Datafeedr. This particular product set that we are looking at is entitled mower cables. You can see that within our saved search there are 151 products. Let’s have a look at our saved search so we can check that we have all the correct products in our saved search.
I will check page one first and then work through the pages. I normally find that the first pages are the most accurate pages for search and then the products can potentially become not quite so inaccurate as we get towards the last pages. However, it does depend on your niche and what you are searching for.
As we can see, there are lots of products that we do not want to be included in this particular product set. I’m going to have a look at the second page and check that I have the correct products in the product set. I can see that we have a mains cable extension lead in the product set; this is not something that I want to show.
Add A Filter
We now need to go back to our search page, and I will add a filter to this page. I’m going to add the filter, “product name” and then in the next filter I’m going to set the drop down menu to “matches”. There are many different filters that we can add to these menus; however, on this occasion I want to add the above filters.
First of all, I will add the minus symbol as this is going to be a negative search. In other words, it’s a word that we don’t want to be included in our search. I will then write the word “mains”. So at the moment, we have 151 saved searches, I will click on search and let’s see what search producers. Our search is now down to 147 products. That has now removed any words in our product name with the word “mains”.
Use The Pipe Symbol
There are a number of products in this product set that I do not want to be included in our saved search. So, I’m going to use the pipe symbol, which is next to the “Z” key and also shares the backslash key. Due to the fact that there are quite a few products that I don’t want to be included, I have copied a number of words that I don’t want to appear in our product name search.
I will paste the twelve words and phrases into the correct area. All these words come from the product name. I see that I have one word that is actually two words, the software will actually read it as two words. To overcome this issue, I will put the word “self-propelled” into quotes; in this way, the software will read the word as one word.
Before I created this video, I was going through all the unwanted searches that were not required. So for the purpose for the video I removed all the words and have now pasted words back. In general, I don’t normally have this number of words to exclude from my search. There are some searches where you do not have to remove any products, the searches are actually perfect in some cases.
Remove Unwanted Products
Let’s now click on our search button to see how many unwanted products we can remove. The saved search is currently at 151, I will click on the search button and wait for the result. This may take a few moments as we have got a few products to go through. My server is also being upgraded, so there are a few issues with it today. Sometimes a server can timeout, but not very often. You can see now in our saved search we have 151 products and in the actual search, there is a total of 39 products.
I will just check the two pages of products to check all the rogue products have been removed mower. It looks like our product set just only mower cables within it, which is exactly as I wanted.
Don’t Forget to Save the Product Set!
Our current saved search is saying 151 products, but our actual search is 39 products. I now need to update the saved search. Now our saved search is telling me that there are just 39 products in the saved search. I now need to update the complete product set to save our work.
We also have the option to bump the product set up if required. I normally bump the product set up just to update everything.
In this video want to talk about how to carry out basic keyword research for writing your first blog posts. I’m on the Wealthy Affiliate platform; you can see my profile page here. I have been a member of the platform for some time; I’m actually now in my ninth year. The platform takes you through a series of lessons which teaches you how to build an online business. So, in this lesson, I want to take you into the basics of finding keywords for your website.
Recently I started a series on how to build a web business from scratch. In other words, taking you through the process of how to start an online business. The last video I created was actually on November 28th 2022, which was about how to create custom menus in WordPress.
Sometimes I think people overcomplicate keyword research; the thing to do is to produce quality content and to do it regularly. Google really seems to like consistency; it pays in the long run. So I will take you through the process of what you need to do.
Jaaxy Keyword Tool
Here I have a tool that comes for free with the Wealthy Affiliate platform; you can create a free account here. The tool is called the Jaaxy keyword tool. The keyword tool may look slightly different as I have an enterprise account. However, even with the starter membership, you have access to the Jaaxy keyword tool and a number of searches to test out the tool.
You can see my new website here that is very basic, it’s called a countryman’s view. It’s basically a Christian website that talks about current affairs, news and the Christian life etc. I didn’t particularly set the website up as a money-making website; it’s more of an evangelistic tool. However, in the future, I may start doing some book reviews and other products that are related to my niche. The only content I have on the website at the moment is my about me page and terms and conditions. I will start adding content probably in the next video.
Carrying Out A Keyword Search
Let’s get back to our keyword search; you can see here that I have carried out a search for “Christian books”. Now you can search for anything that you like, whatever your niche might be. I have other websites on garden products and associated things. Whatever your niche is, the principles are the same.
You can see that my search has brought up many different websites. All these searches are what we call natural searches; as I scroll down to the bottom of the page, you will see some paid advertising. At the foot of the search page, we can see that we have Audible and another website below Audible. These are actually paid searches or sponsored listings; you can see they have the word “ad” next to the web address. We want to aim to be in the natural search, we don’t want to pay for traffic to our website. We don’t want to pay money for ads at this point in time, I will just write content and let Google find me.
If I go to page 2 on Google, I can see that there are some paid ads. I generally find that there are four paid ads at the top of the page, followed by pages that are found through a natural search.
Use The Jaaxy Keyword Tool
To help me become ranked in Google, I will use the Jaaxy keyword tool to give me some ideas on keywords etc. Once again, you can create a free account on Wealthy Affiliate. I have put in the search “Christian books”, you can also see that on a previous day, I used some different search terms for a different niche. You can put in whatever works relate to your niche.
You can see that there are lots of different numbers related to our search. The first row of figures relates to the average number of searches that the keyword receives per month. The next column is traffic, which refers to visits to your website if you receive page 1 rankings in the search engines. QSR means quoted search results for the number of competing websites ranked in Google for the exact keyword. We then have the keyword quality indicator, Green is great, orange is normal and red is poor. We do not have any words that are poor in this search. And then finally, we have the SEO column, which is a score based on traffic and competition. The higher the score, the more likely you will rank for this keyword on the first page. (Scale of 1 – 100, higher equals better).
QSR Score
I’m going to have a look at the QSR score. I’m going to look for words or phrases that have a score of under 100. The software allows me to save any keywords that I want to use into a list by checking the various boxes. We can create as many keyword lists as we want. We can either save it to an existing list or create a new list.
The keyword finder enables me to click on various phrases or words for me to go deeper. So, this will enable me to find even more words where we can potentially rank in the search engines.
To Conclude
As mentioned in this video, I think some people overcomplicate keywords. The main thing is that you write content and write regularly. In my opinion, we are better off writing regularly rather than spending too much time on keyword research.
If you have any questions about the video or blog post, I am here to help. You can contact me by commenting on the video or writing on my profile Page.